TPM and BitLocker: Stealing the key to the kingdom
Hey,
Hi friend, nice to see you again!
My laptop has been an important part of my life since college, and I bet I’m not alone, but have you ever thought about what could happen if your laptop was lost or stolen? At a personal level, your digital life, such as social medias, bank accounts and private things, could be accesed and leaked online. At a corporate level, the entire network of your company could be at risk.
To protect our privacy and avoid such extreme cases, full disk encryption is an important security measure and implemented in most modern operating systems, however, not all implementations are born equal. Today we’ll talk about TPM, BitLocker, Windows full disk encryption and how to steal the key to the kingdom. This study is a hands-on approach to the excellent research Sniff, there leaks my BitLocker key by Henri Nurmi, hope you enjoy.
Before jumping to the fun part, let’s see a little about BitLocker and TPM.
BitLocker
BitLocker is a Windows security feature present since Windows Vista/Server 2008 that provides encryption for entire volumes/disks. It was implemented to address the growing concern of data theft in case of physical access to the disk, like in stolen or lost laptops and hard drives.
Since Windows 10, BitLocker uses Advanced Encryption Standard (AES) as encryption algorithm with CBC (AES-CBC) for removable data drives, XTS (XTS-AES) for OS volumes and fixed drivers and configurable key lengths of 128 bits (default) or 256 bits.
Architecture overview
How does it works?
Briefly, the volume’s raw data is encrypted with a Full Volume Encryption Key (FVEK), this FVEK is then encrypted by a Volume Master Key (VMK) and stored in the metadata section of the encrypted volume. The VMK is then encrypted by one or more of the several possible key protectors and recovery scenarios and also stored in volume’s metadata.
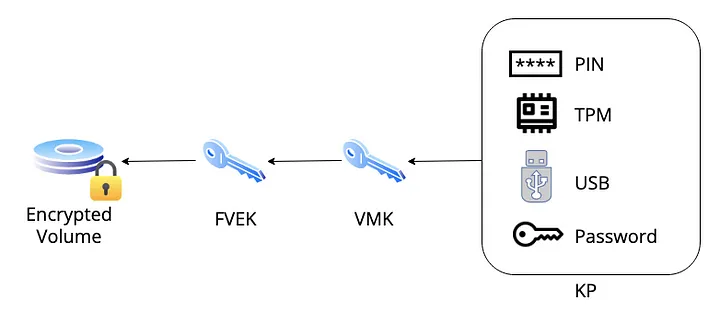
You may be thinking “why use this three-key-schema? Why do not directly encrypt the FVEK with the key protectors?”. Simple, in the case of any of the key protectors is compromised, corrupted or changed, all key protectors can be replaced and only a new VMK will have to be created, the FVEK will not change and the encrypted volume will not have to be reencrypted.
Ok, but what the heck is key protectors and recovery scenarios?
Key protector is an authentication method used to prevent the VMK from being stored in the volume in plaintext, which could compromise the strength of the implementation. A key protector can be one of the following methods: [7]
- Trusted Platform Module(TPM): Uses the computer’s TPM to protect the encryption key. Users can access the encrypted drive as long as it is connected to the system board that hosts the TPM and the system boot integrity is intact.
- TPM and Personal Identification Number(PIN): Uses a combination of the TPM and a user-supplied PIN. By default a PIN is four to twenty digits or, if enhanced PIN is enabled, four to twenty letters, symbols, spaces, or numbers.
- TPM, PIN, and startup key: Uses a combination of the TPM, a user-supplied PIN, and input from of a USB memory device that contains an external key.
- TPM and startup key: Combination of the TPM and input from of a USB memory device.
- Startup key: Uses input from of a USB memory device that contains the external key.
- Password: Uses a user defined password.
- Recovery key: Uses a self-generated recovery key stored as a specified file in a USB memory device.
- Recovery password: Uses self-generated recovery password.
- Active Directory Domain Services (AD DS) account: Uses domain authentication to unlock data volumes. Operating system volumes cannot use this type of key protector.
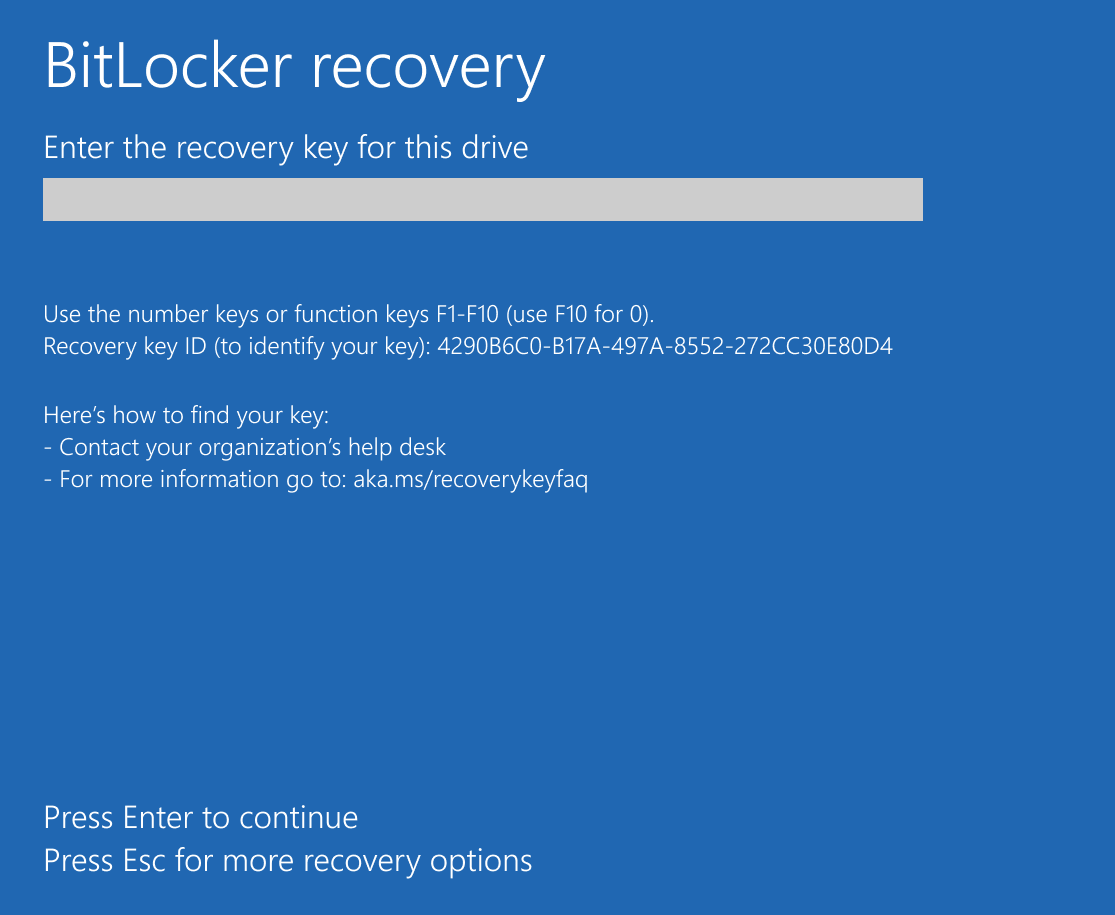
Recovery scenario, or BitLocker recovery mode, is the process by which access to a BitLocker-protected volume can be restored if the volume could not be unlocked by its default unlock mechanism. It can happen by several reasons, like: [8]
- Entering the wrong PIN too many times.
- Changes to the NTFS partition table on the disk
- Changes to the boot manager
- Turning off, disabling, deactivating, or clearing the TPM
- TPM self-test failure
- Upgrading the motherboard to a new one with a new TPM
- Upgrading critical early startup components, such as a BIOS or UEFI firmware upgrade
- Modifying the Platform Configuration Registers (PCRs) used by the TPM validation profile
- Moving a BitLocker-protected drive into a new computer
- On devices with TPM 1.2, changing the BIOS or firmware boot device order
- Exceeding the maximum allowed number of failed sign-in attempts
Trusted Platform Module (TPM)
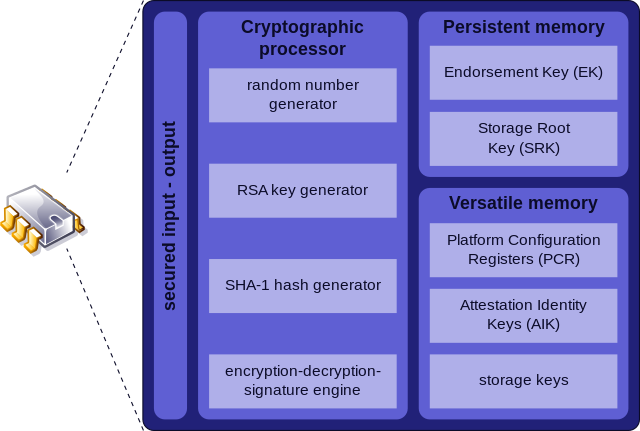
Trusted Platform Module (TPM) is an international standard (ISO/IEC 11889) to hardware-based cryptographic chips, usually implemented as a dedicated microcontroller (cryptoprocessor) or embedded into the CPU, designed to enhance systems’ security by providing the following capabilities:
- General cryptographic operations
- Random number generator and generation of cryptographic keys
- Keys and secrets storage
- Binding/wrapping
- Tamper resistance
- System integrity check (verify if the boot process was started by a previously trusted combination of hardware and software)
TPM works with BitLocker by ensuring the devices’s hardware and software/firmware weren’t tampered, and if everything is fine, it releases the key to decrypt the VMK.
What if my computer does not have a separated TPM chip? No worries, it’s been a long time since Intel and AMD had embedded its microprocessors with TPM functionalities, a technology known as “integrated TPM” or “CPU-based TPM”. On the blue side, Intel states that its processors, since 8th generation (Coffee Lake), have an integrated TPM that adheres to the 2.0 specifications and offers the same capabilities of a discrete TPM, but residing in system’s firmware, known as Intel PTT (Platform Trust Technology)[9]. On the red side, information is a little more dispersed, but several unofficial sources claim that AMD processors have a TPM implementation since Ryzen Zen 1, known as AMD fTPM (firmware TPM).
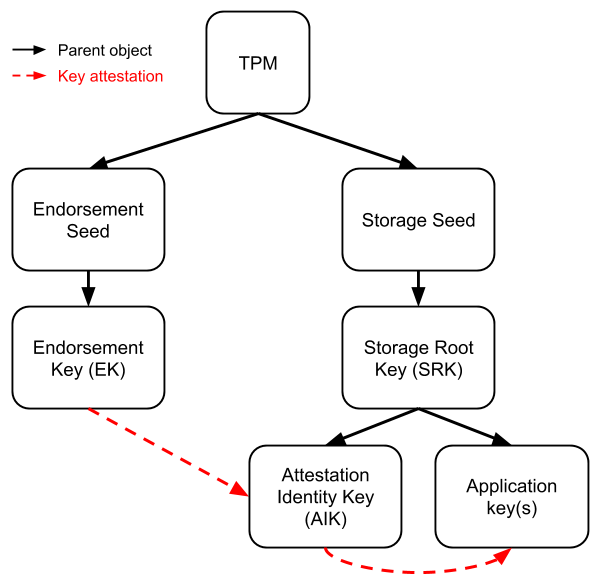
Architecture overview
Endorsement Key (EK) is an RSA asymmetric key pair (EKPriv and EKPub) burned into the TPM chip at manufacturing time (stored in a non-volatile memory space). It’s unique for every chip and can be used to identify the chip itself. It cannot be accessed, changed or removed by any external entity.
Due to its uniqueness, is only used in a limited number of procedures. Therefore, to protect user’s privacy when interacting with other entities, the use of the EK is restricted and Attestation Identity Keys (AIKs) are generated and used for routine transactions. [13]
Storage Root Key (SRK) is an RSA asymmetric key pair generated by the TPM when a user/process takes ownership of it. In our case, is the Windows OS that takes this ownership when it boots for the first time. The SRK is stored internally in a non-volatile memory space, and while the private key is inaccessible externally, the public key can be accessed.
The process of encrypting a secret/key with the public SRK is called “binding” or “wrapping”. This way the secret can only be decrypted by the TPM, which helps to protect against a myriad of attacks.
Attestation Identity Key (AIK) is an asymmetric key pair that work as an “alias” for the EK, being the one used for routine transactions. It’s mainly used to provide platform authentication based on the attestation capability of the TPM (attestation = evidence or proof of something).
Platform Configuration Registers (PCRs) are memory locations in the TPM chip mainly used to store hardware and software integrity measurements, which will be used later to prove the integrity of the system.
For example, the validation process start by checking the BIOS, creating and storing a hash of it in a PCR; then the hardware is checked, with a hash of it also stored in a PCR; next the same happens to the partition table (MBR/GPT) of the disk, and so on. Each stage of the boot process is responsible for hashing the next and storing it in a PCR.
Avenues of attack
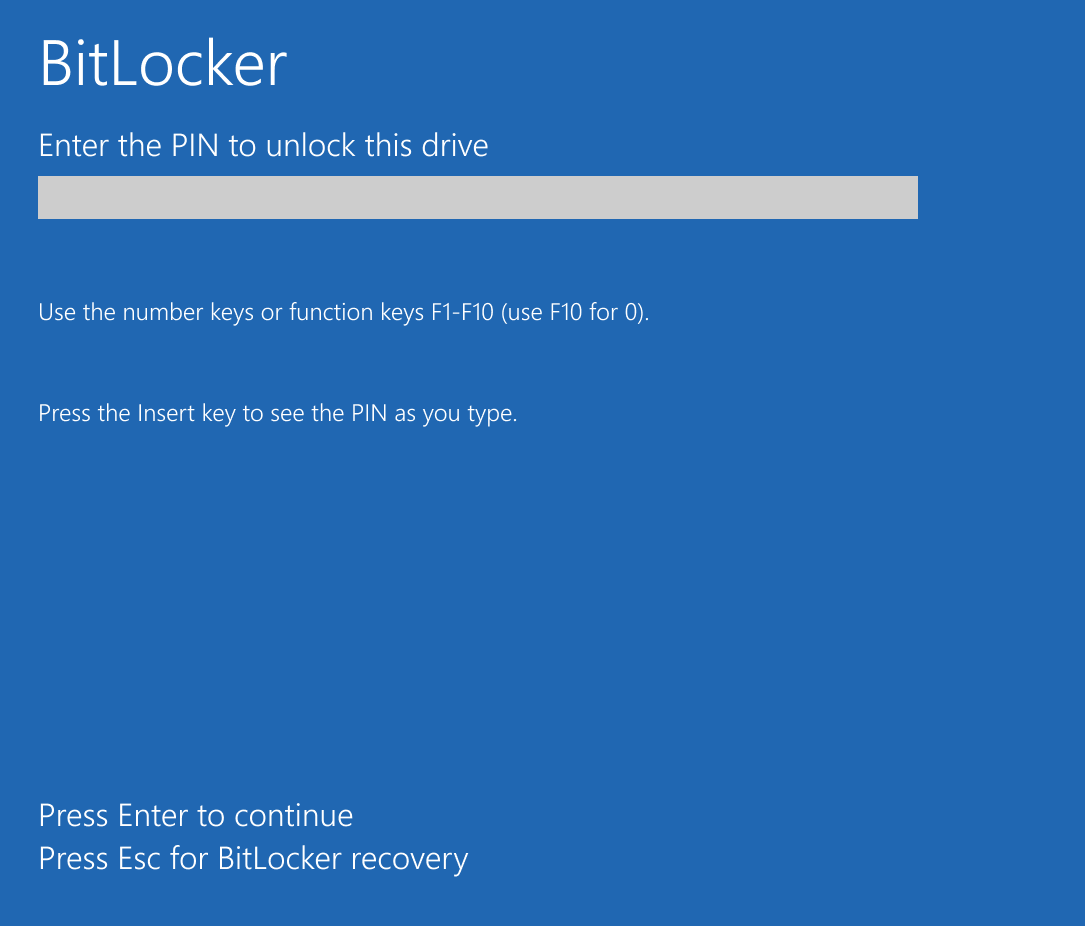
The first boot was smooth and we were presented with the Windows login screen after a few seconds, which is good because it means the machine was not configured with pre-boot authentication.
After a bit of research we found the following image from the terrific work An ice-cold boot to break bit locker by Olle Segerdahl & Pasi Saarinen, which gave us a north:
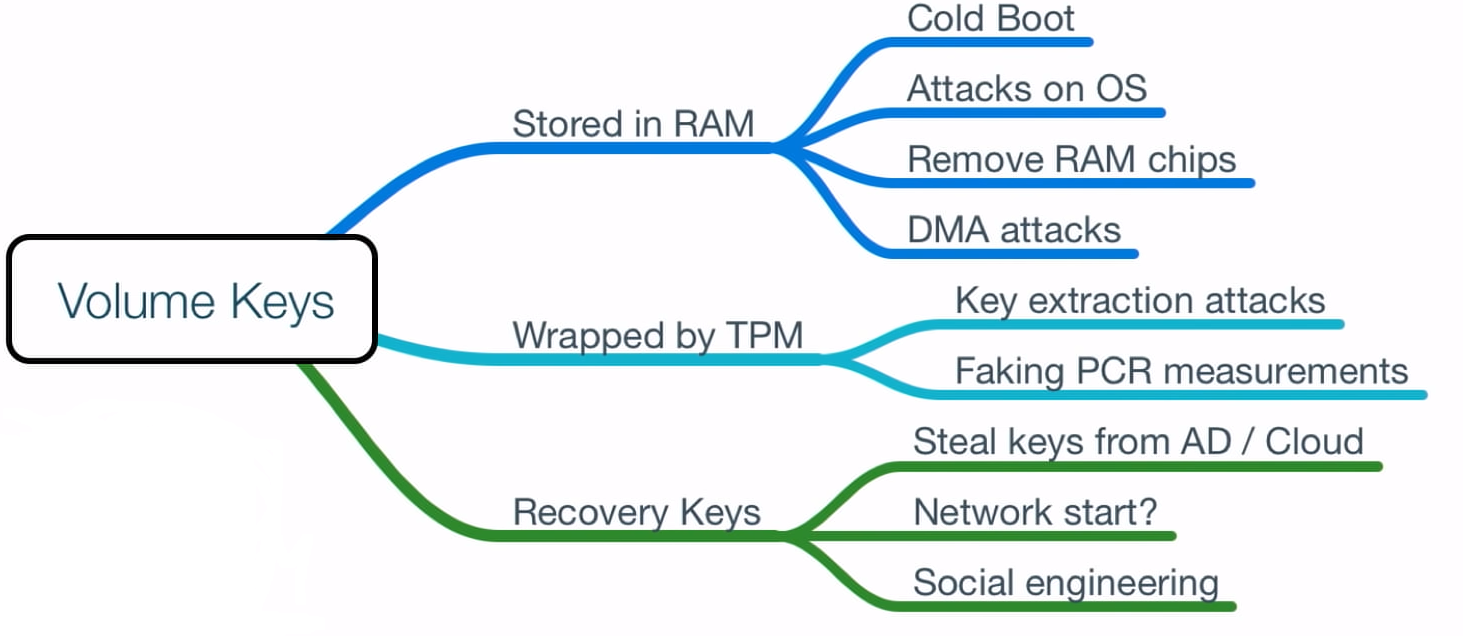
The Recovery Keys section was out-of-scope, whe didn’t have access to their network nor their AD, and social engineering was denied (it always is).
The Stored in RAM section had a good potential, mainly because the RAM chip was removable, but due to some constraints we decided to leave it as a second option.
But why attacks to the RAM would probably work if the key is stored in the TPM? By the time the computer boots and reaches the Windows login screen, a lot already happened: TPM verified the system integrity, released the protector to decrypt the VMK, BitLocker used the plain VMK to decrypt the volume, the system was mounted and ready to the user. In the end, the VMK is decrypted and stored in plain in computer’s RAM, the ideal scenario for a memory attack like the cold boot attack.
The Wrapped by TPM section seemed quite impossible at first, but then we found the excellent research Sniff, there leaks my BitLocker key by Henri Nurmi, what we decided to try first.
The heist
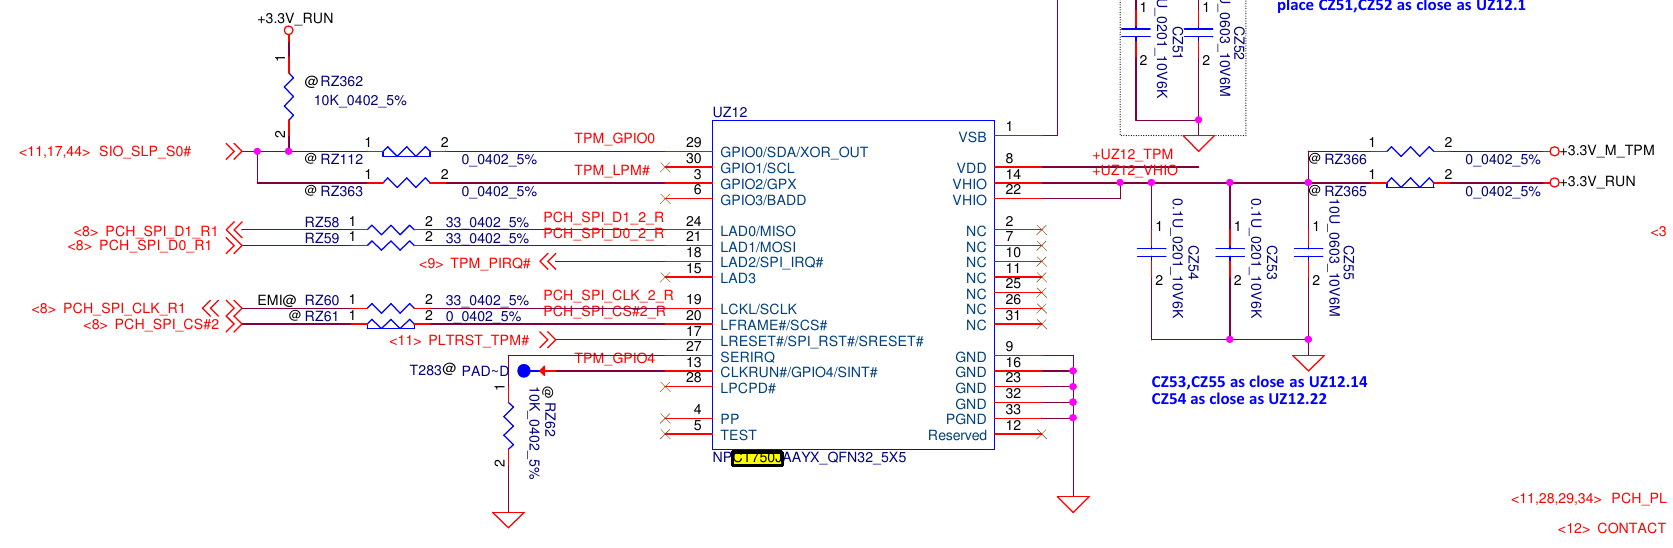
If we want to attack the TPM, we first need to find the TPM, and to this we need the motherboard schematics of the machine:
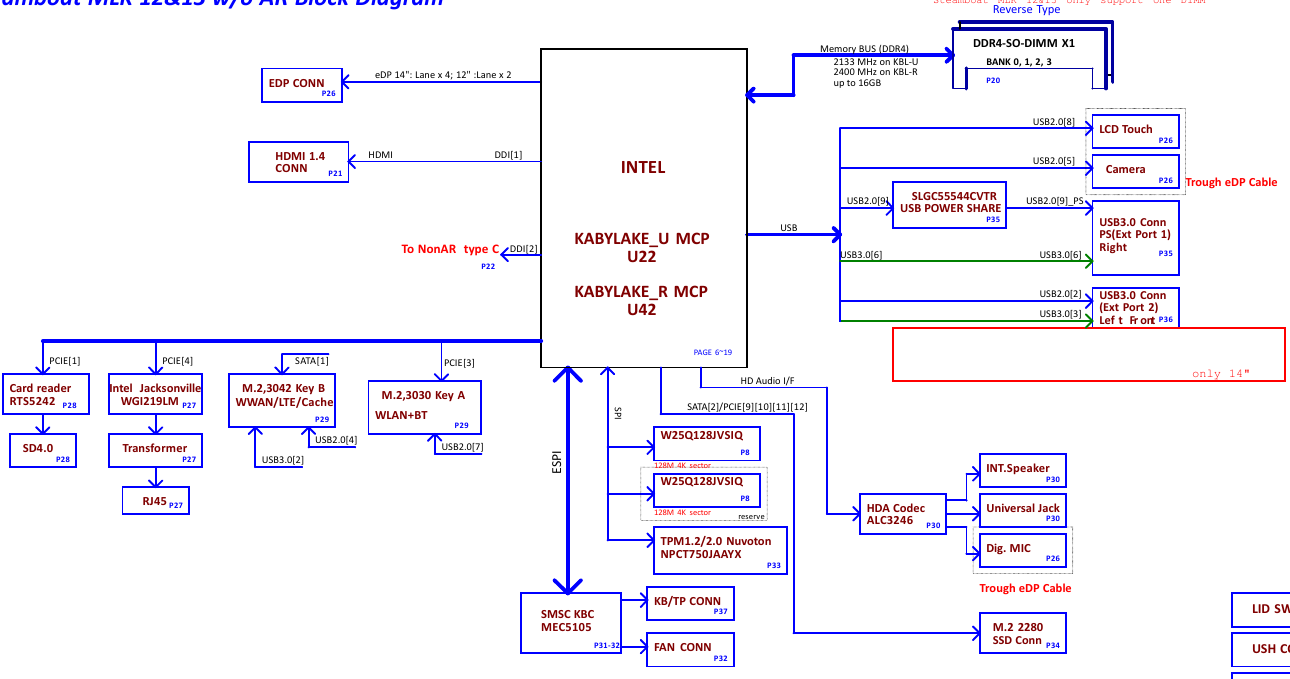
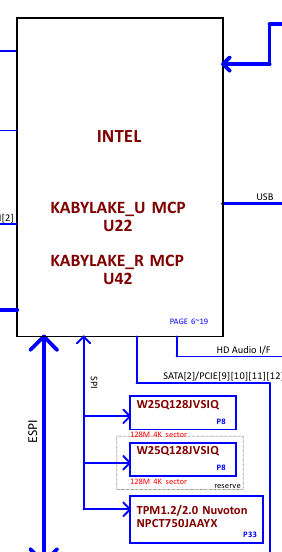
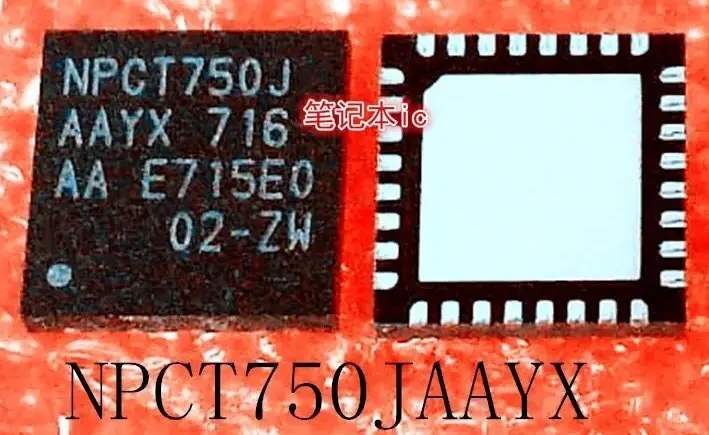
Great, our machine not only have a dedicated TPM chip (TPM1.2/2.0 Nuvoton NPCT750JAAYX) but also communicates with the CPU by a SPI bus shared with other chip (W25Q128JVSIQ). The schematic also have details about these chips:
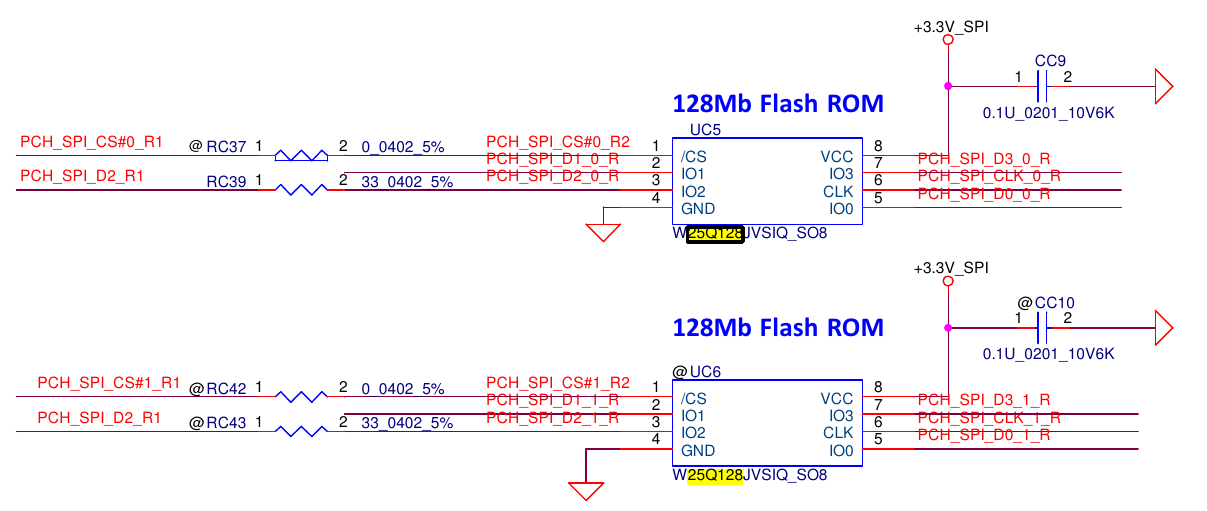
Wait, 128Mb Flash ROM? YES! We’re talking about the BIOS chip here! So, essentially, our TPM chip communicates with the CPU by a SPI bus shared with the BIOS chip.
But why this is so amazing? Because if we take a look in this TPM chip we will see it’s of type QFN-32, which makes contact with its pins much much harder. The BIOS chip, on the other hand, is usually much bigger and with pins much easier to be hooked, and because they share the same SPI bus we can sniff the CPU-TPM communication by hooking the BIOS. Simply fantastic!
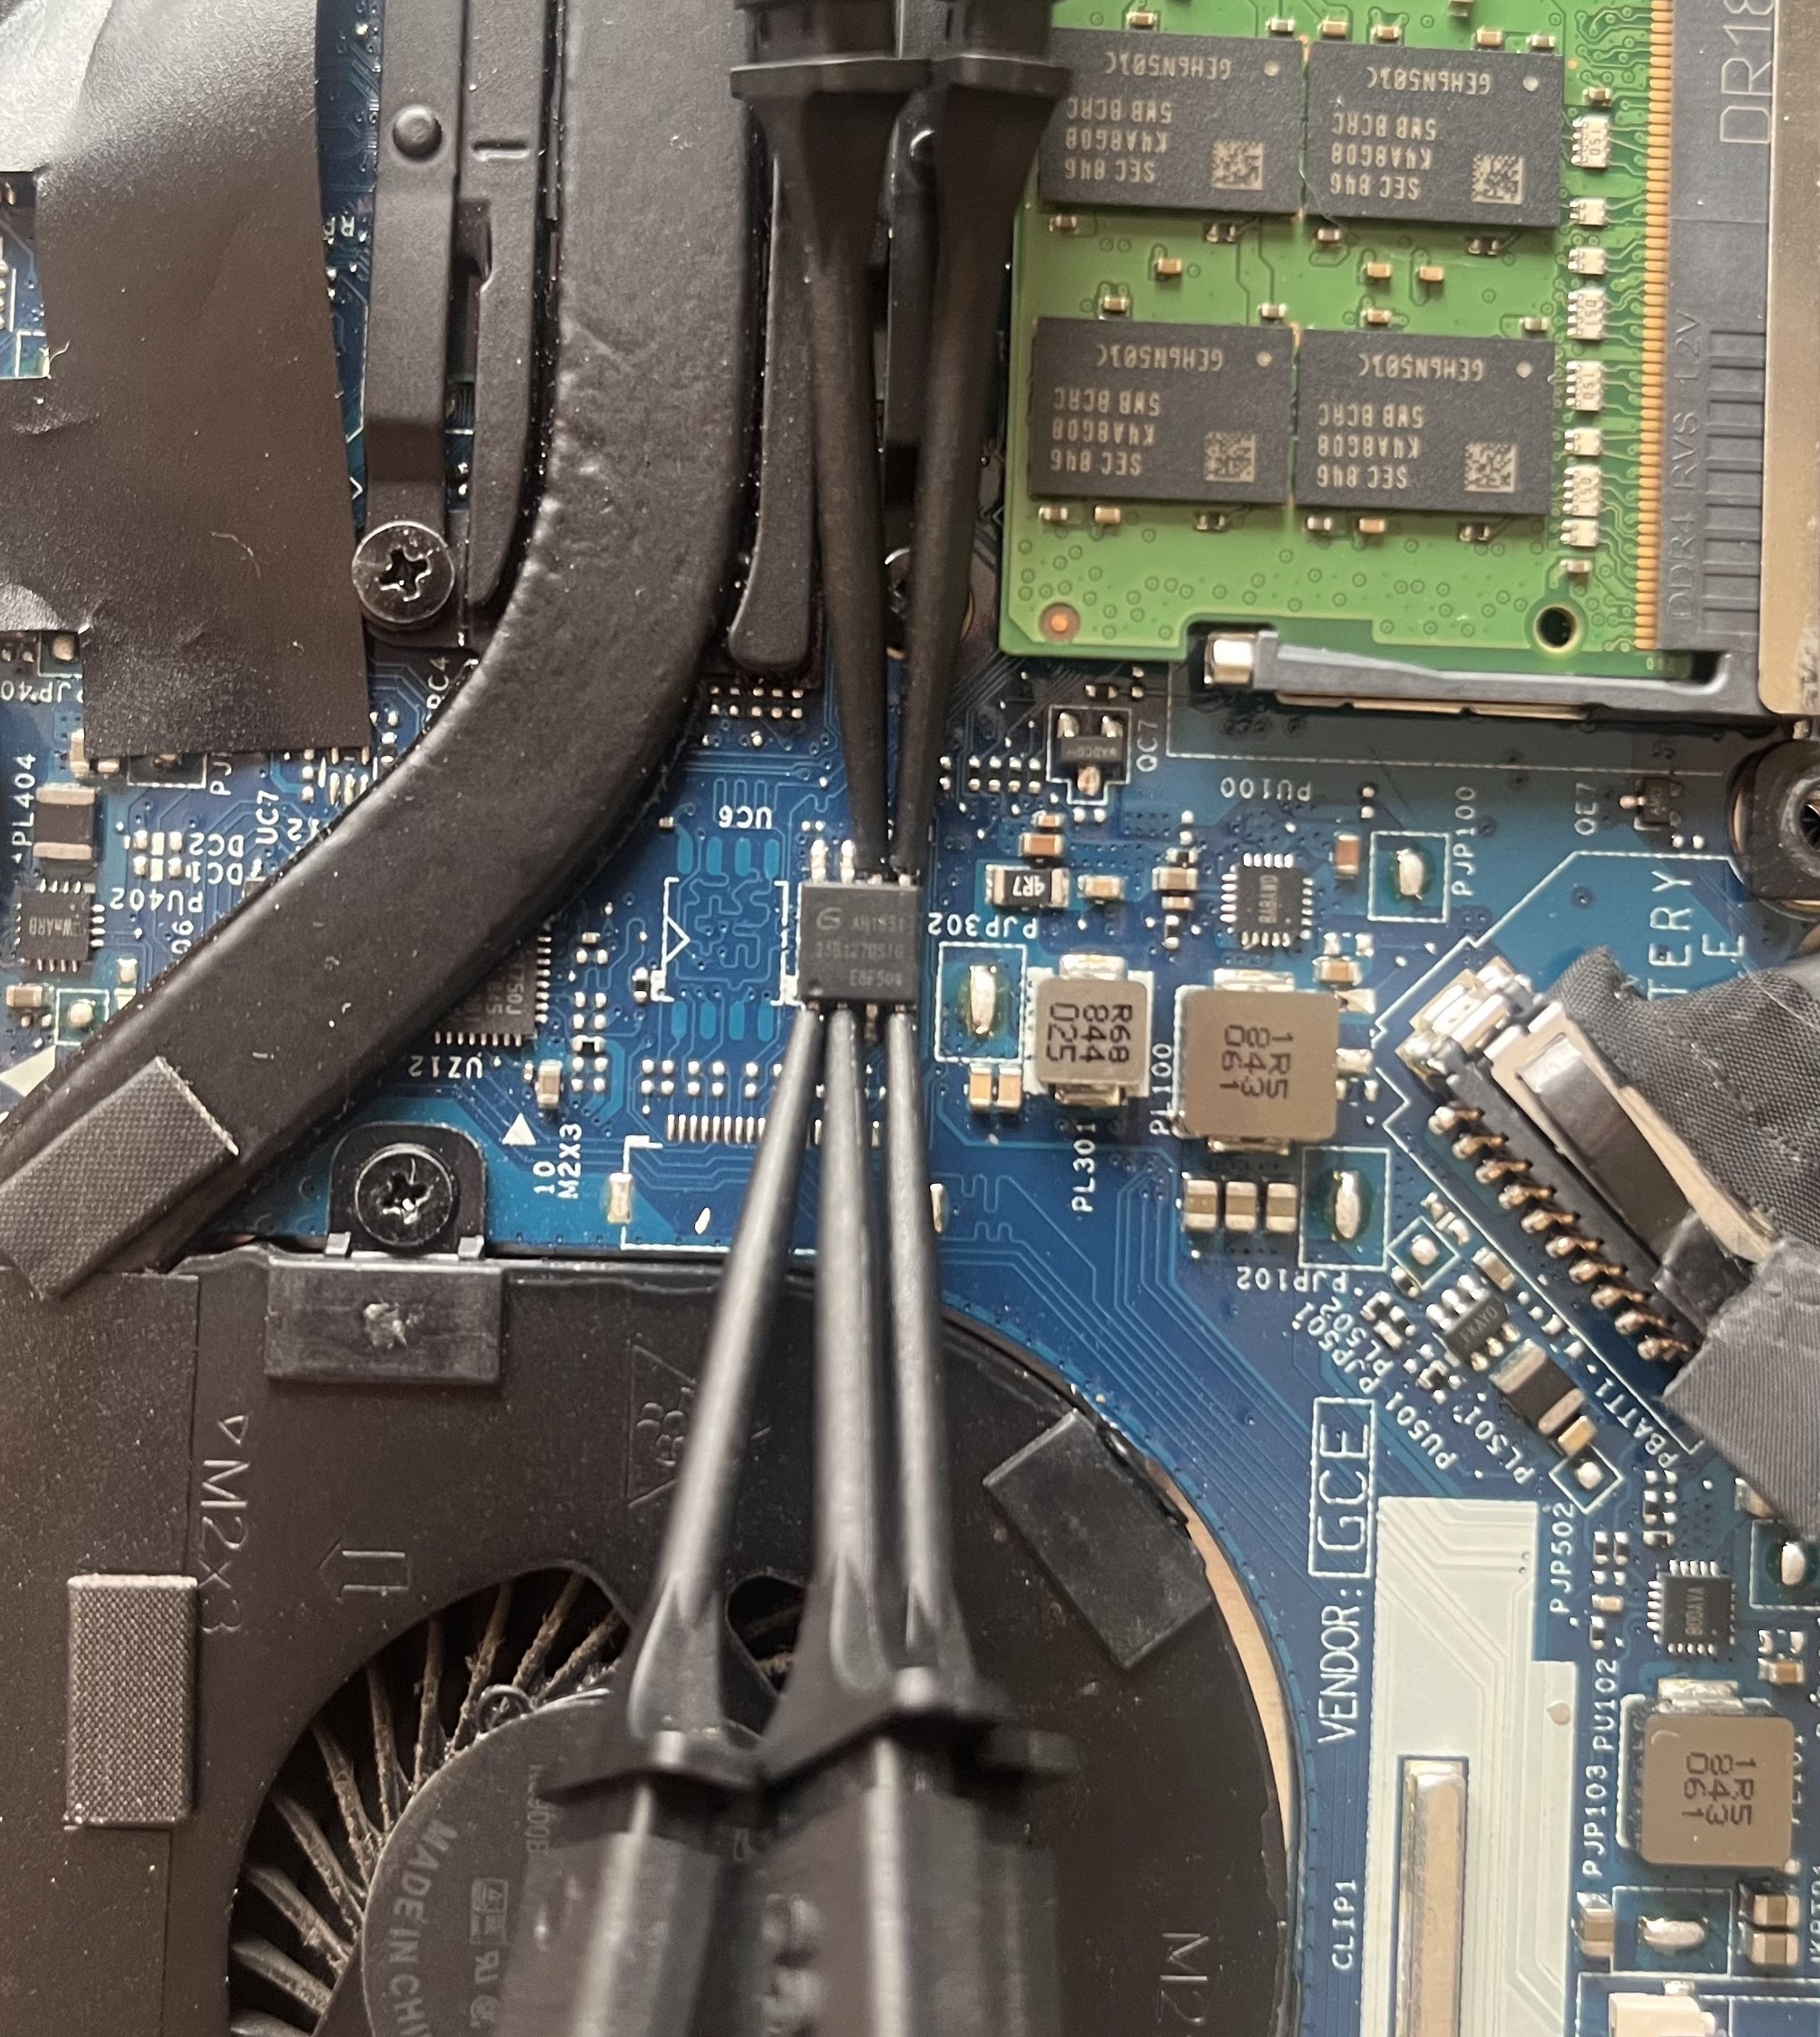
What can happen is that the actual BIOS chip in the motherboard is from a different brand than the one in the schematics, but no worries, they should be quite identical. In our case we have a “GIGADEVICE GD25B127D”, and the schematics of both are identical:
Now comes the expensive part. To do the spoofing we’ll need a logic analyzer capable of recording four logic signals simultaneously at a sampling rate of at least 100MHz, but beware, this base value to the sampling rate is purely theoretical due to the average speed of SPI (25MHz), however we ended up needing much more than this (250Mhz), so pay attention when buying a logic analyzer different from the one used here. Nevertheless, we’ll use a Saleae Logic Pro 8 (told it would be expensive).
And as a side note: both Arduino and Raspberry Pi have projects to transform them into a logic analyzer, so they can come in hand for future projects, but not in here.
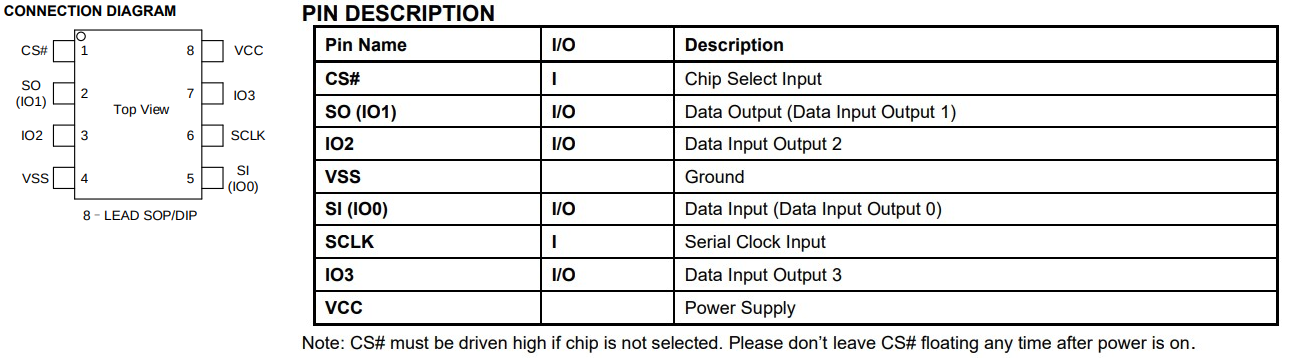
Finally hooking some wires, but how? Well, SPI communicates through four logic signals:
- CS (Chip Select): Used by the Master to indicate which Slave he’s communicating with. This is the only line that cannot be shared between Slaves, with each one having a separated CS line to the Master
- SCLK/CLK (Serial Clock): Used by the Master to indicate the communication clock to the Slave
- MOSI (Master Out Slave In): Used to transfer data from Master to Slave
- MISO (Master In Slave Out): Used to transfer data from Slave to Master
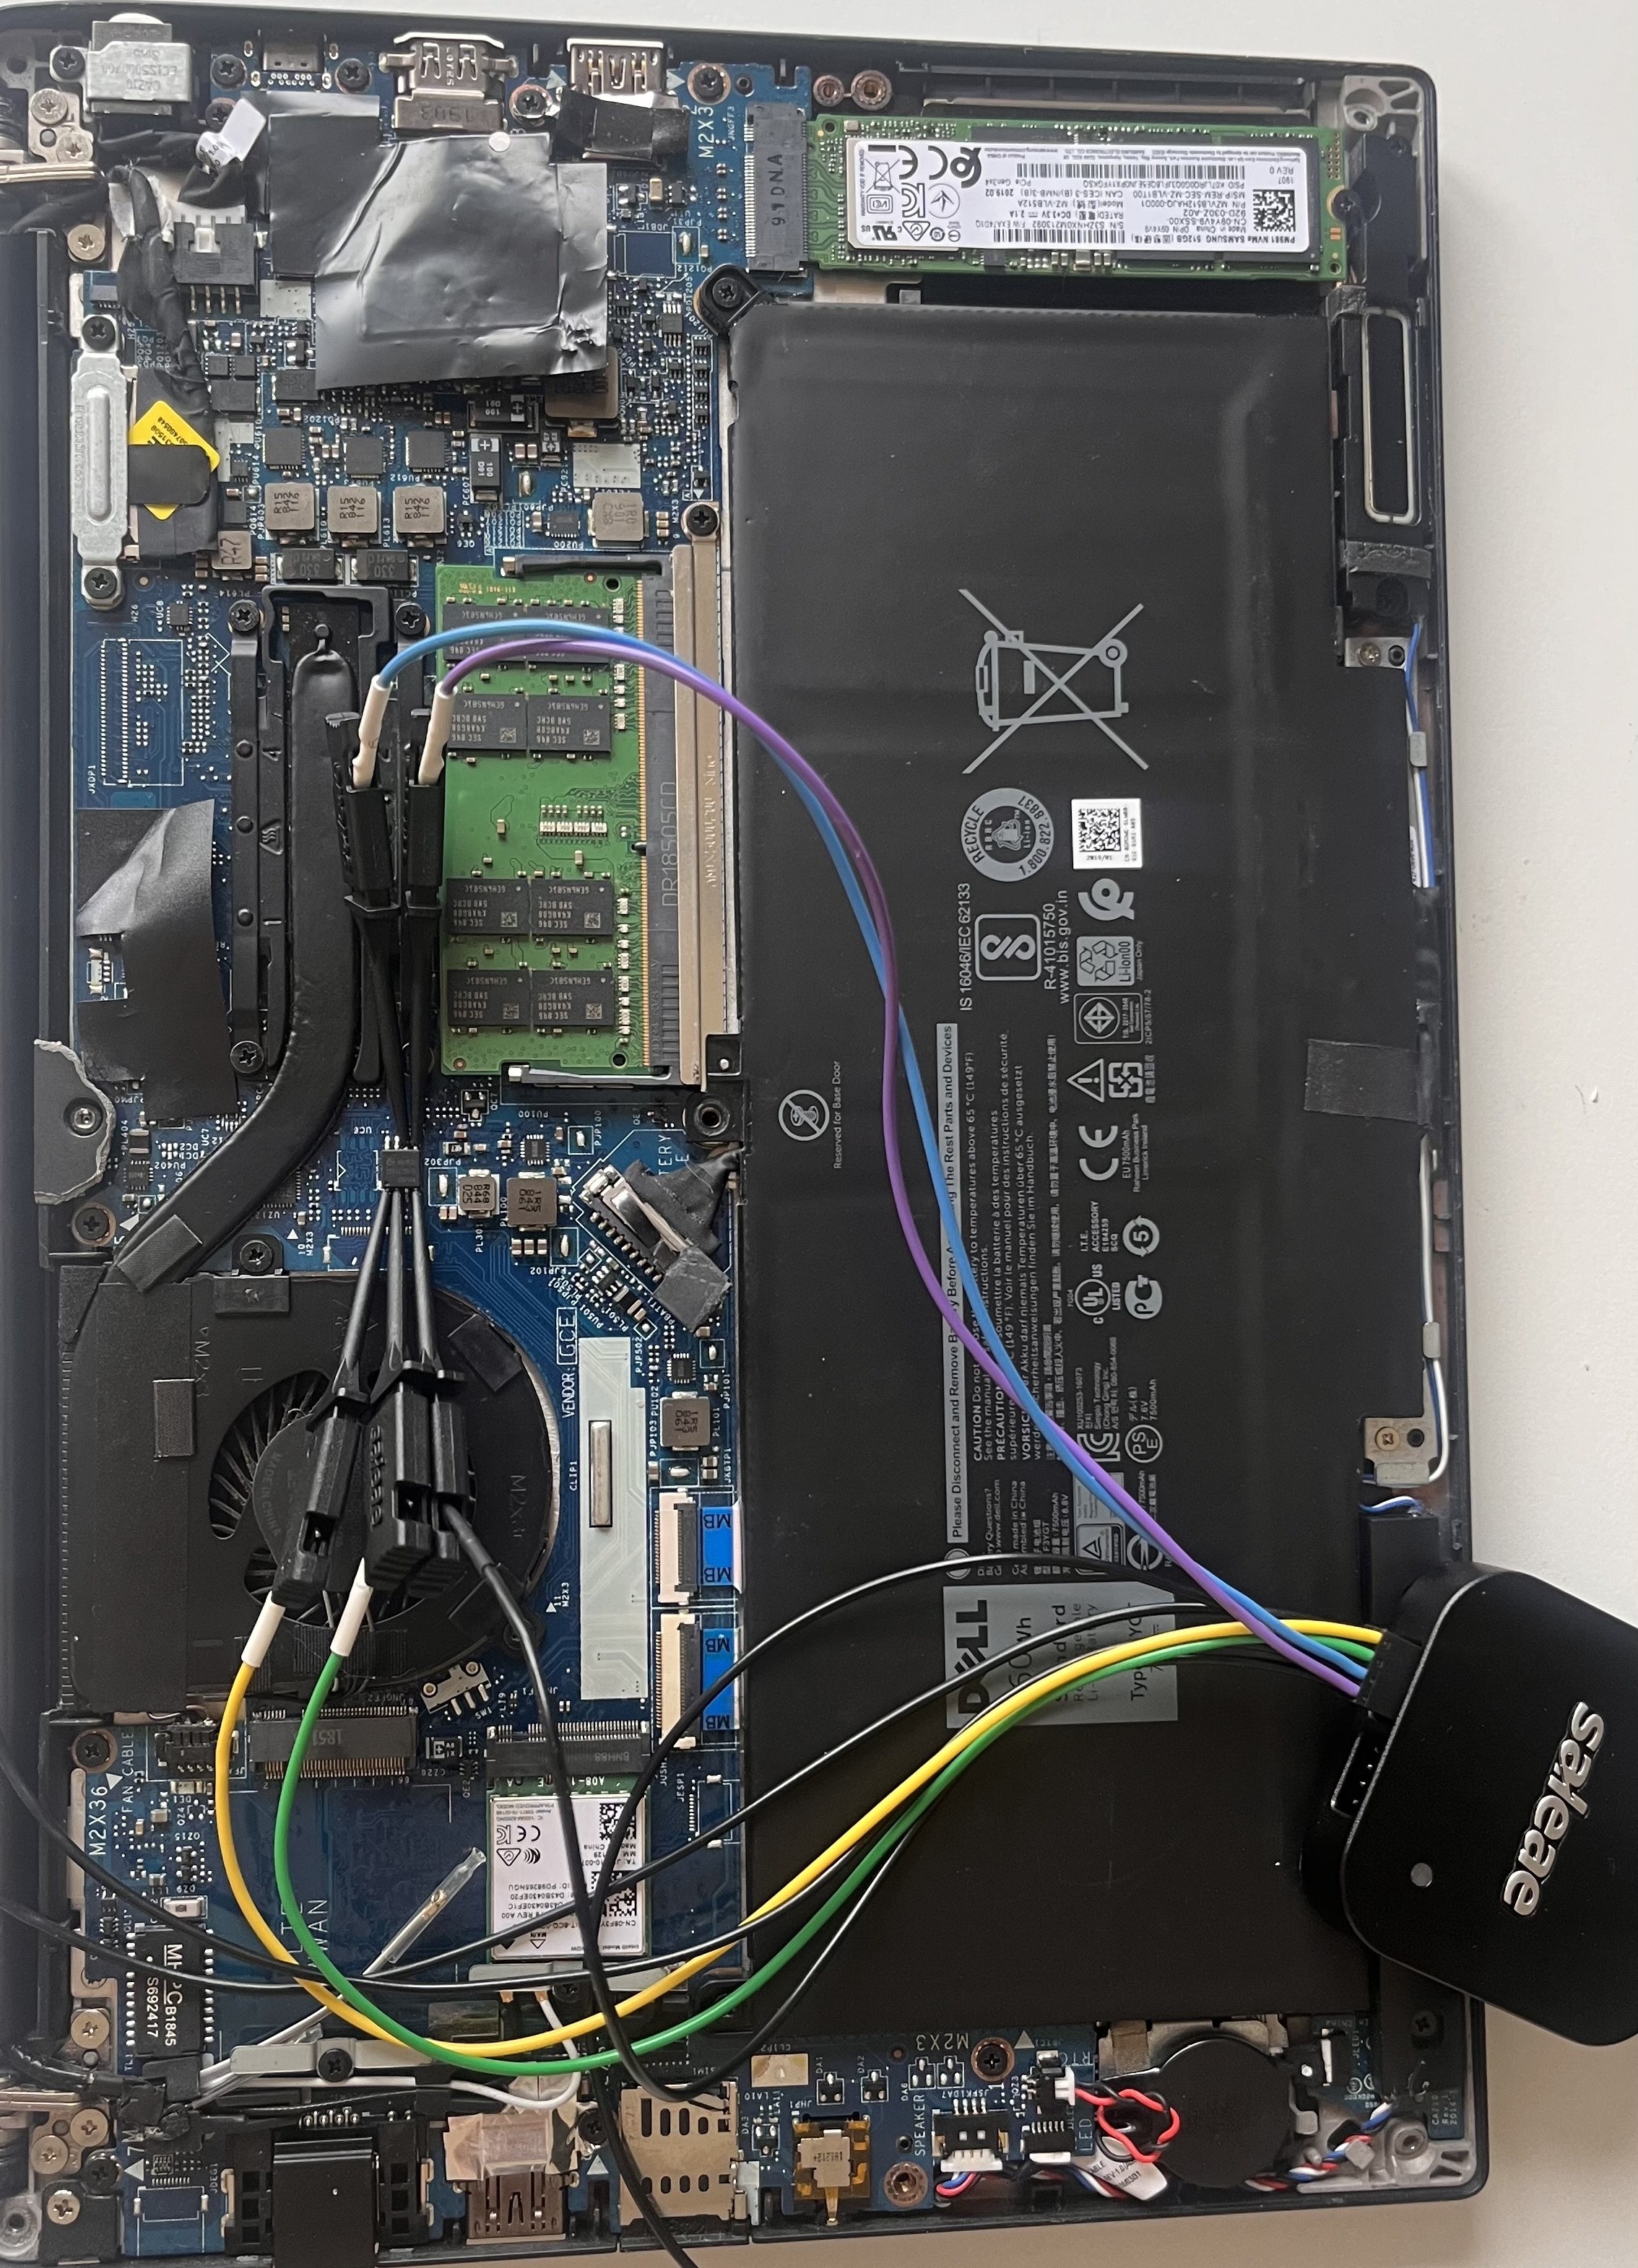
Using the schematics above our hook ended up like this:
- Yellow wire: from Saleae port 0 to chip pin 1 (CS)
- Green wire: from Saleae port 1 to chip pin 2 (SO)
- Black wire: from Saleae port “ground” to chip pin 4 (VSS)
- Blue wire: from Saleae port 2 to chip pin 6 (SCLK)
- Purple wire: from Saleae port 3 to chip pin 5 (SI)
On the software side, we will use the free Logic 2 from Saleae, with the custom high-level analyzer extension bitlocker-spi-toolkit, which will do all the hard work for us.
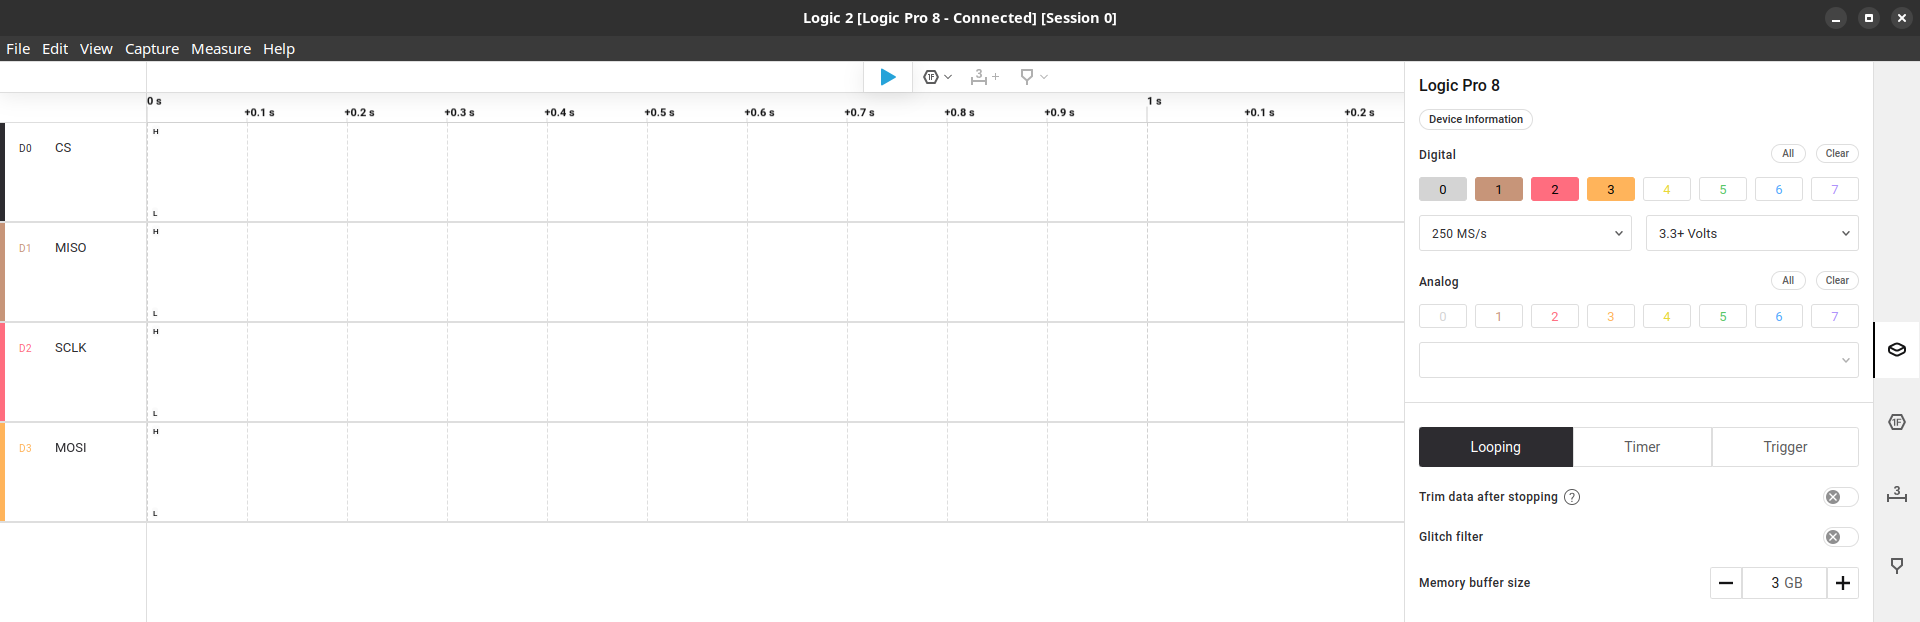
When you open the Logic 2 with a Saleae attached you’re directly redirect to the capture session screen, where we’ll set some device parameters for the capture:
- Add the digital signals from 0 to 3
- Change signal names to relate with our pinouts (you don’t have to, but helps)
- Set the sampling rate to 250 MS/s
- Set the voltage to 3.3+ Volts. I did some tests with different sampling rates and voltages but these were what worked to me.
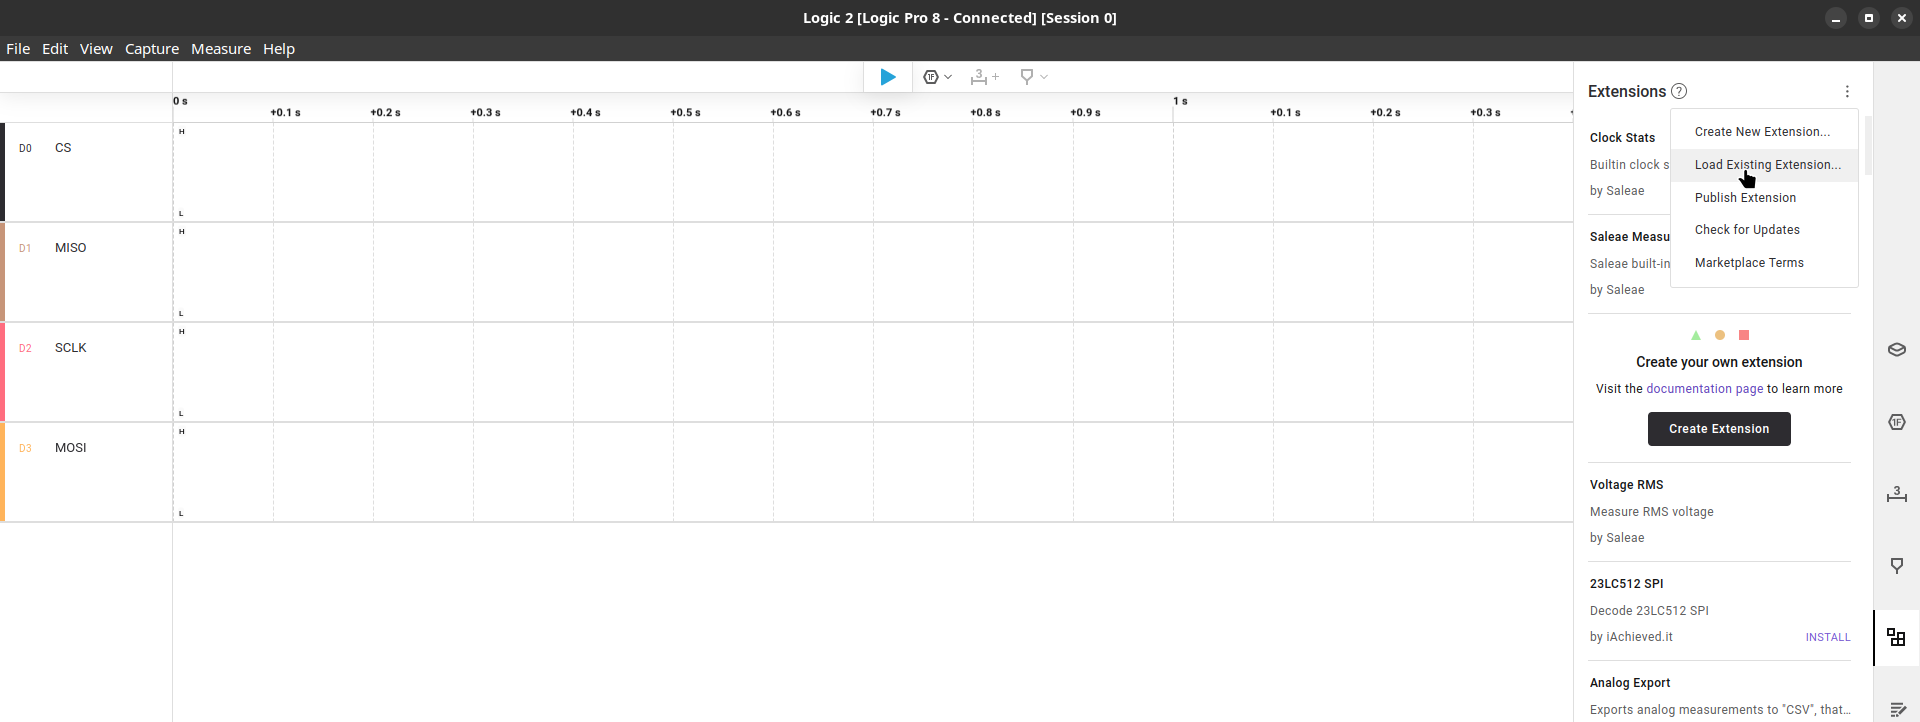
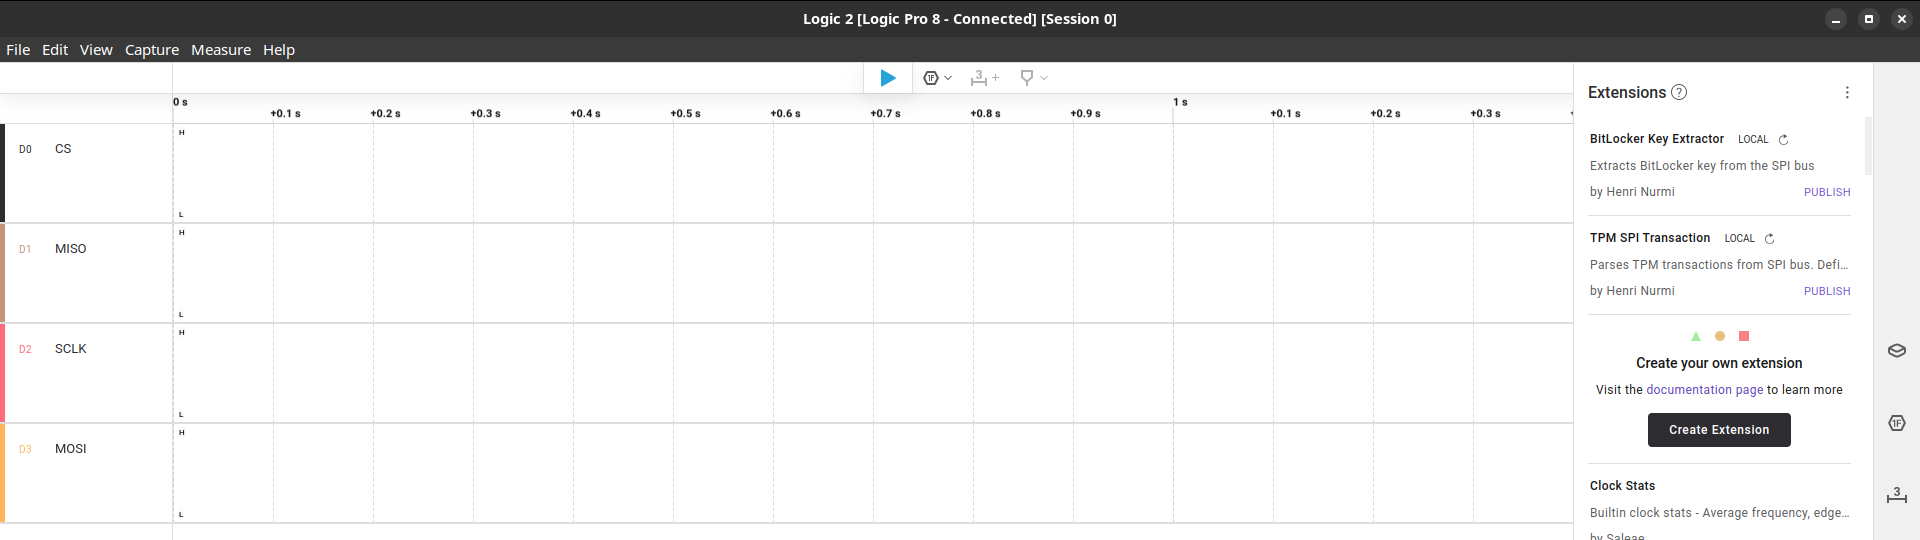
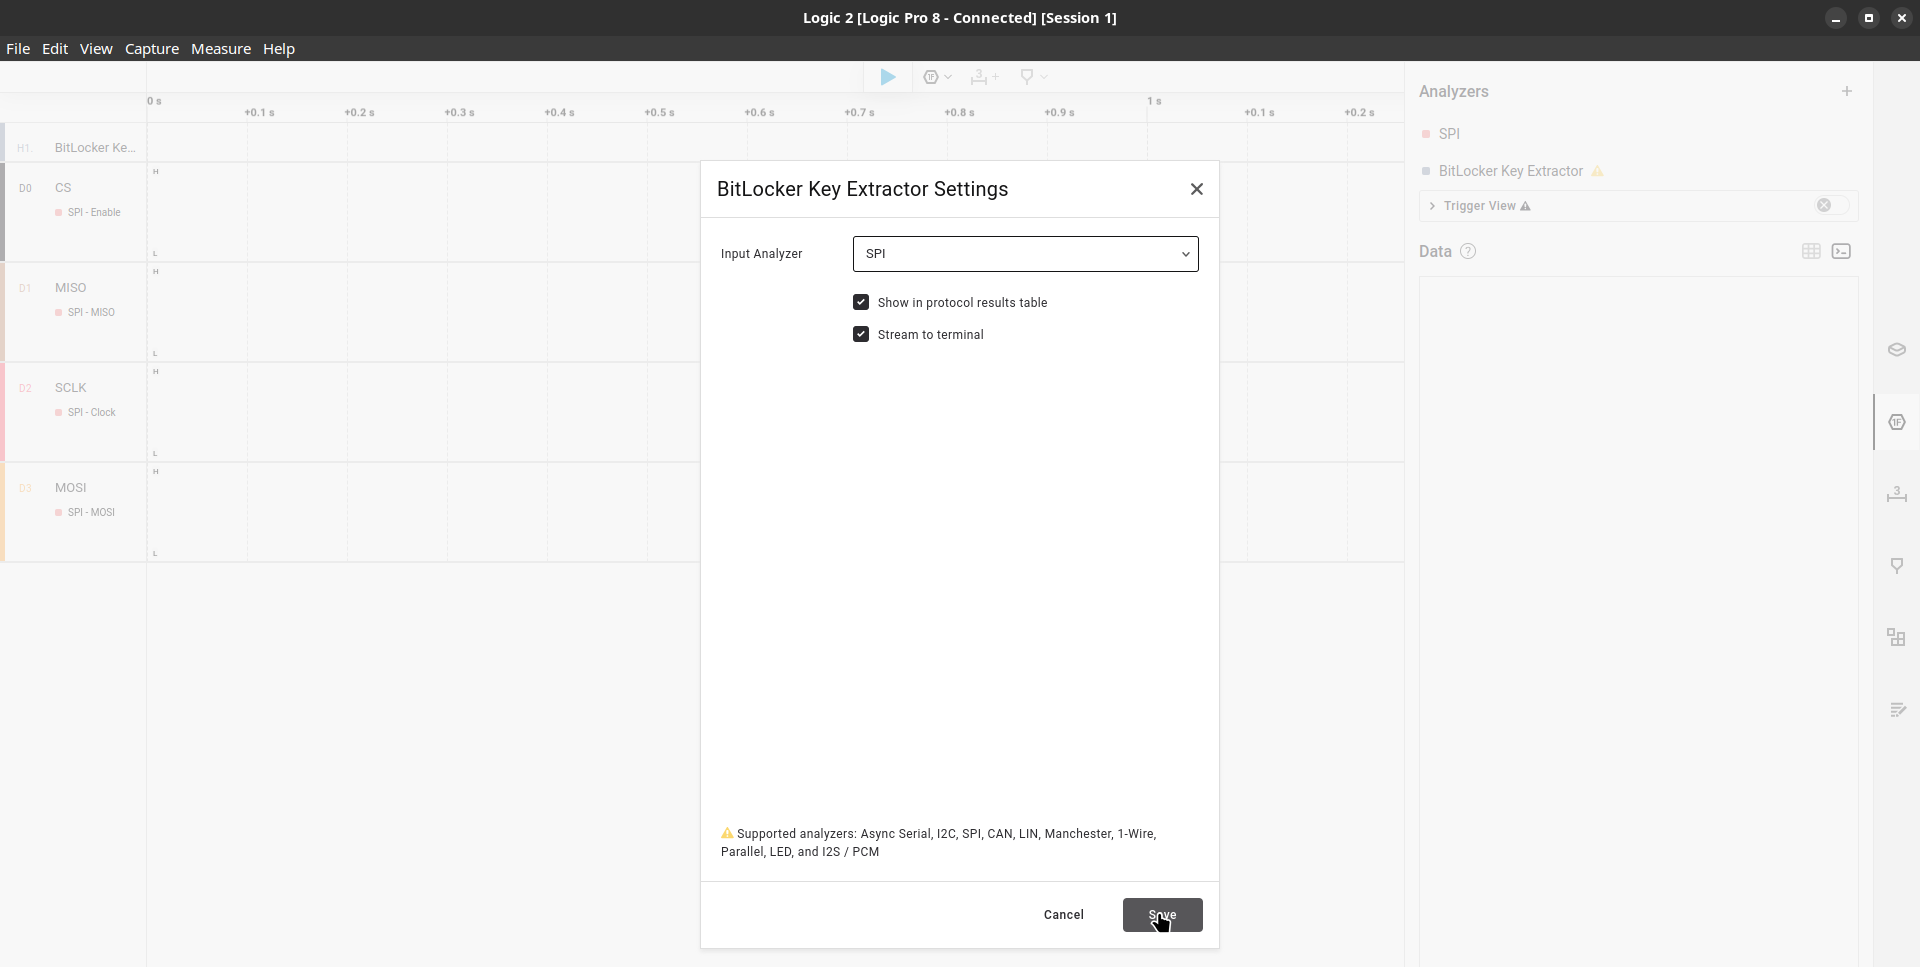
Next we go to the “Extensions” tab where we’ll load the “BitLocker Key Extractor” from bitlocker-spi-toolkit.
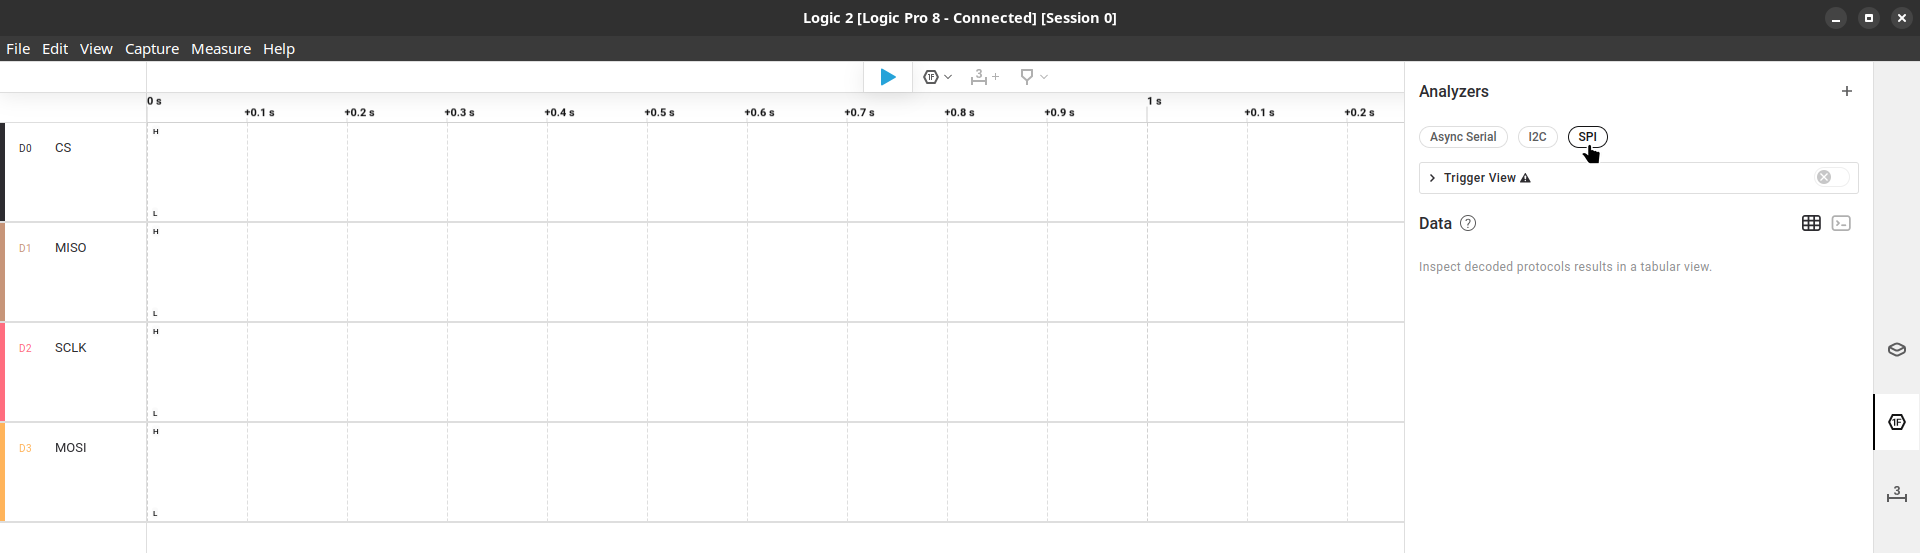
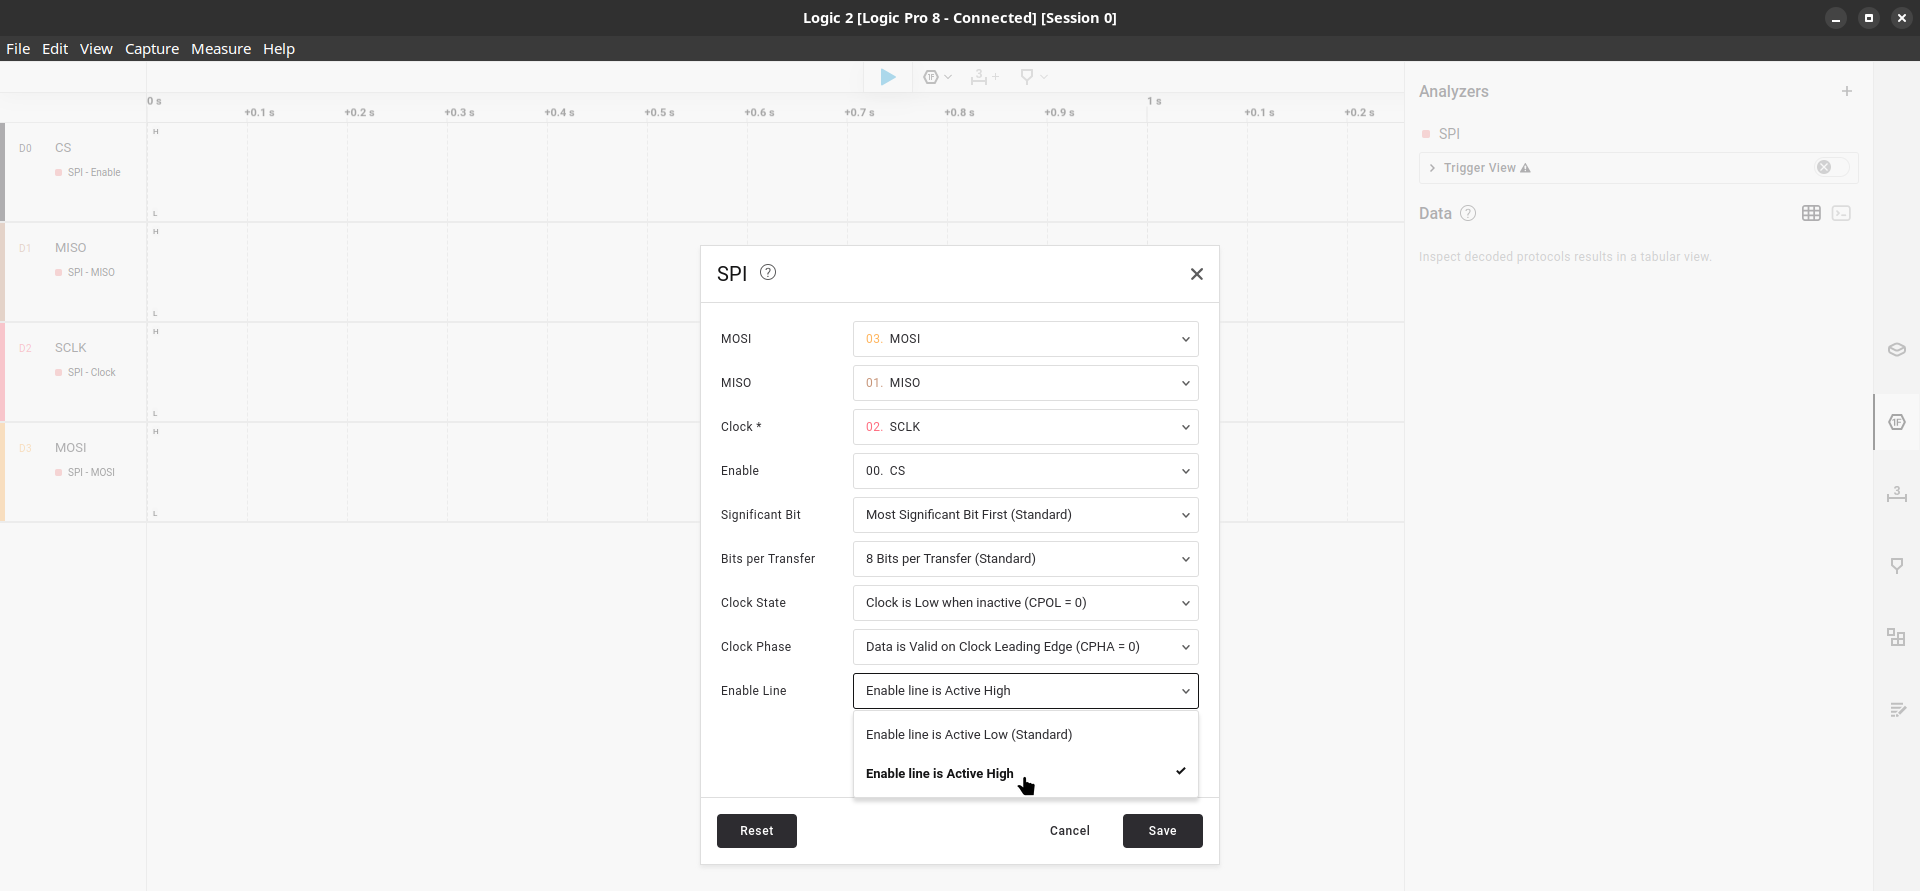
Last the “Analyzers” tab where we’ll set and configure the communication protocol (SPI) and the “BitLocker Key Extractor” extension.
Here is where naming the signal lines at the beginning comes in handy, also, we need to adjust the “Enable line” option. As you may remember, we’re capturing the TPM signals through the BIOS chip so our CS signal is inverted.

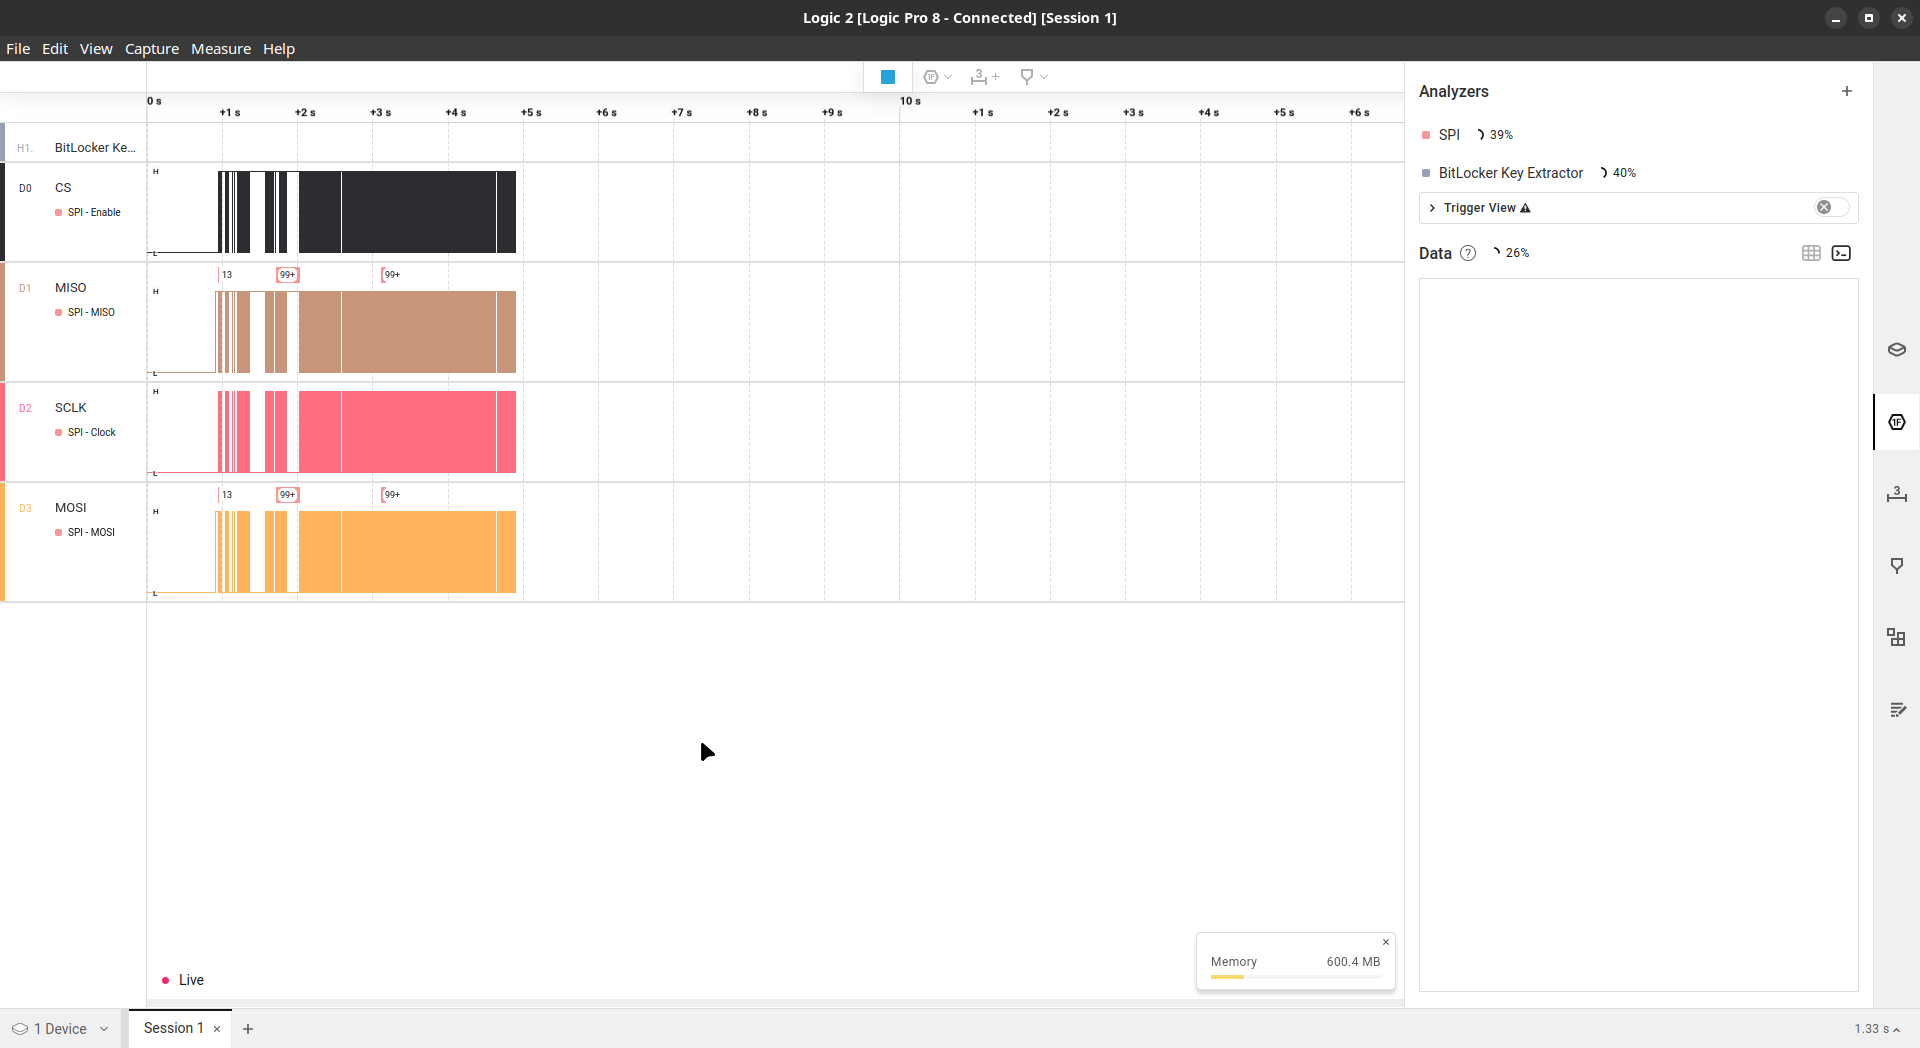
With everything set, we can finally capture the VMK. Press the play/capture buttom, turn on the laptop, wait and pray (and don’t forget to stop the capturing when Windows finishes booting). If everything run as expected you’ll get the VMK in hex:
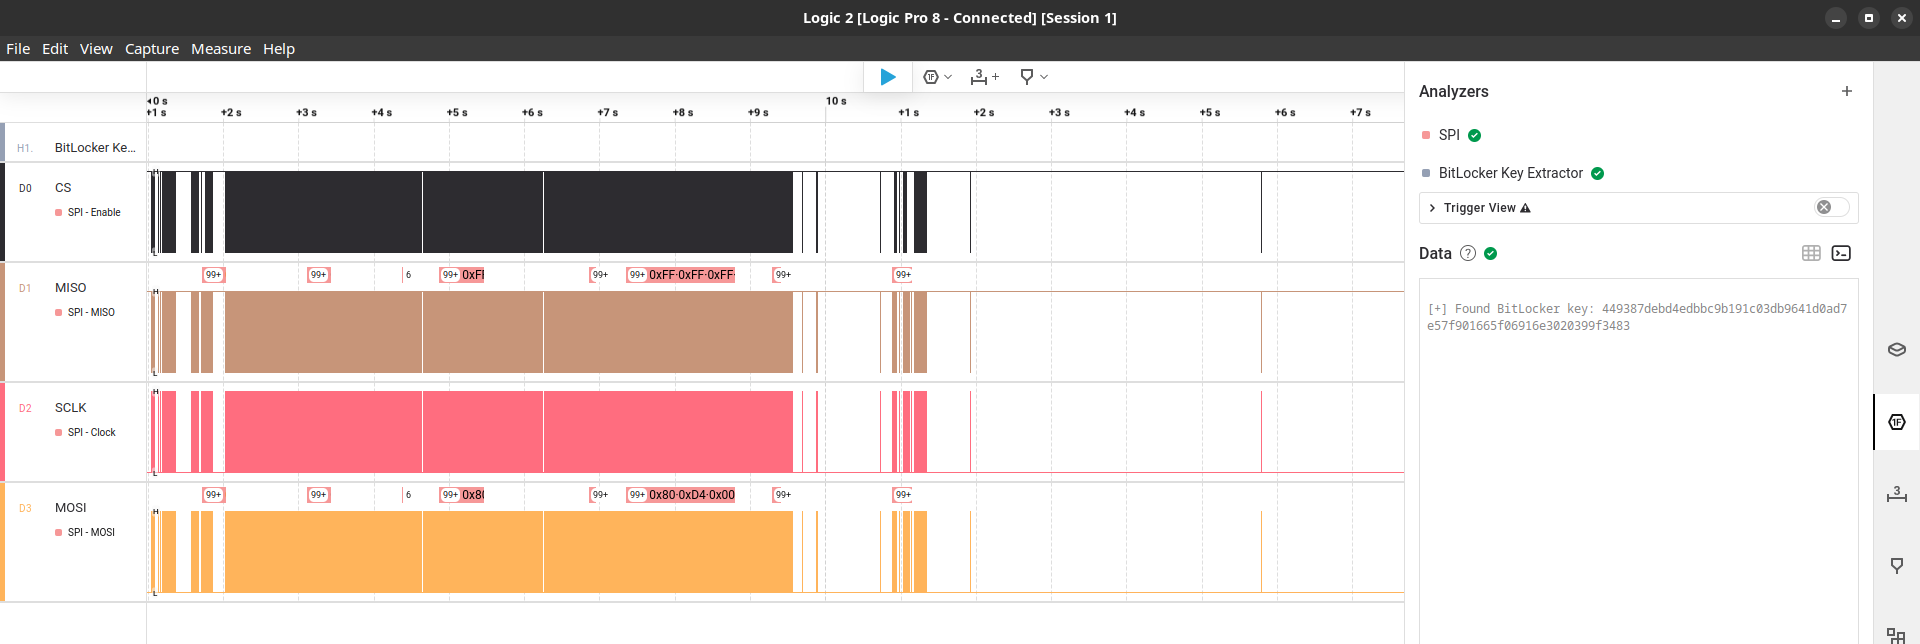
With the VMK in hands we have two options: boot the laptop with a USB live Linux, like Ubuntu, or remove the HD/SSD and connect it to another machine with Linux. For the sake of simplicity we’ll boot into a Ubuntu and mount the encrypted volume. To this we’ll use the “xxd” command to convert the VMK from hex to binary, the “dislocker” tool to decrypt the volume and the “mount” command to mount the decrypted volume:
$ echo "449387debd4edbbc9b191c03db9641d0ad7e57f901665f06916e3020399f3483" | xxd -r -p > vmk
$ sudo dislocker -V /dev/nvme0n1p3 -K vmk /mnt/dec/
$ sudo mount -t ntfs-3g -o loop /mnt/dec/dislocker-file /mnt/win/
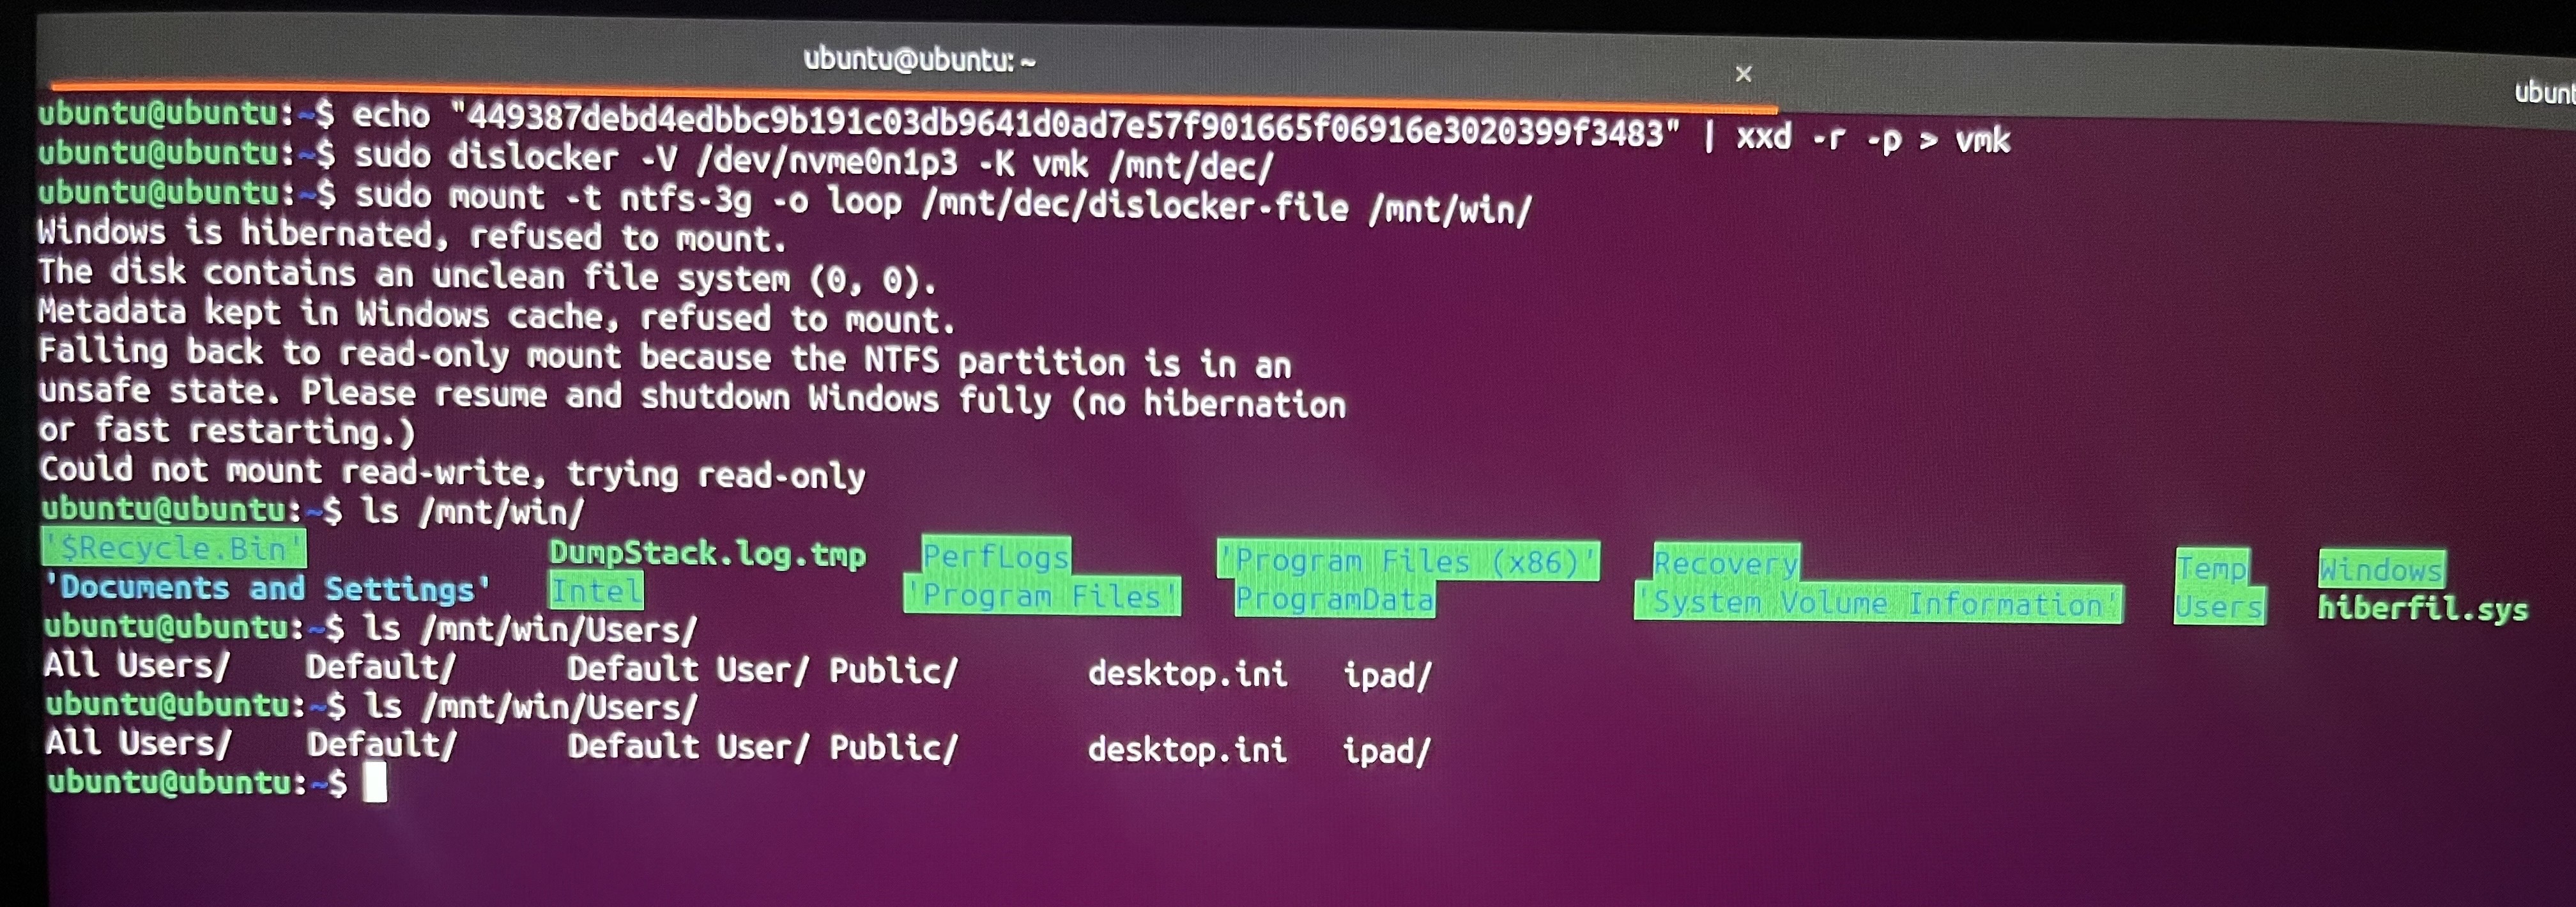
The volume is now decrypted and accessible. Let’s enjoy this moment together for a bit before continuing.
The volume is accessible but in read-only mode, this is because Windows 10/11 have a default feature (Fast Startup) that it enters in a hibernation state-style even when the user requests a shutdown. If you want to force the read-write mode you have to issue the mount command as below:
$ sudo mount -t ntfs-3g -o loop,remove_hiberfile,rw /mnt/dec/dislocker-file /mnt/win/
If it does not work, you can try the following command before the mount:
$ sudo ntfsfix /mnt/dec/dislocker-file
If it still doesn’t work then google is your friend because I have no idea. Nevertheless this approach is not recommended as it may lose data or even corrupt something.
Remediation
Regardless the presence or absence of the TPM chip, a pre-boot authentication with PIN, USB startup key or both should always be implemented. It works almost like a 2FA, ensuring the device can’t boot or resume from hibernation until the correct 2FA is inputed. Even a weak password is better than no password.
Final considerations
That’s all friends, if you got so far thank you for your time and see you again soon.
References
[1] https://labs.withsecure.com/publications/sniff-there-leaks-my-bitlocker-key
[2] https://learn.microsoft.com/en-us/windows/security/operating-system-security/data-protection/bitlocker/
[3] https://learn.microsoft.com/en-us/windows/security/operating-system-security/data-protection/bitlocker/faq
[4] https://learn.microsoft.com/en-us/mem/configmgr/protect/tech-ref/bitlocker/settings
[5] https://en.wikipedia.org/wiki/BitLocker
[6] https://www.hexnode.com/mobile-device-management/help/protect-verification-key-for-bitlocker-encryption/
[7] https://learn.microsoft.com/en-us/powershell/module/bitlocker/add-bitlockerkeyprotector
[8] https://learn.microsoft.com/en-us/windows/security/operating-system-security/data-protection/bitlocker/recovery-overview
[9] https://www.intel.com/content/www/us/en/support/articles/000094205/processors/intel-core-processors.html
[10] https://en.wikipedia.org/wiki/Trusted_Platform_Module
[11] https://learn.microsoft.com/en-us/windows/security/hardware-security/tpm/tpm-fundamentals
[12] https://learn.microsoft.com/en-us/windows-server/identity/ad-ds/manage/component-updates/tpm-key-attestation
[13] https://courses.cs.vt.edu/cs5204/fall10-kafura-BB/Papers/TPM/Intro-TPM-2.pdf
[14] https://trustedcomputinggroup.org/wp-content/uploads/IWG-EK-CMC-enrollment-for-TPM-v1-2-FAQ-rev-April-3-2013.pdf
[15] https://learn.microsoft.com/en-us/openspecs/windows_protocols/ms-wcce/719b890d-62e6-4322-b9b1-1f34d11535b4
[16] https://trustedcomputinggroup.org/wp-content/uploads/IWG-AIK-CMC-enrollment-FAQ.pdf
[17] https://link.springer.com/chapter/10.1007/978-1-4302-6584-9_12
[18] https://deploywindows.com/2017/06/08/whats-the-story-about-tpm-owner-password-and-bitlocker-recovery-password/
[19] https://medium.com/@elcomsoft/unlocking-bitlocker-can-you-break-that-password-6836f1e935fe
[20] https://medium.com/@offsecdeer/decrypting-pending-bitlocker-partitions-7643d167c97f
[21] https://ericchiang.github.io/post/tpm-keys/#key-hierarchies
[22] https://www.slideshare.net/MSbluehat/bluehat-v18-an-icecold-boot-to-break-bit-locker
[22] https://en.wikipedia.org/wiki/Serial_Peripheral_Interface
[23] https://support.saleae.com/faq/technical-faq/what-sample-rate-is-required